

Wednesday 30 March 2016
MAKEUP WISHLIST
With there constantly being new products out on the market I always have a long list of makeup I would love to buy. However, makeup can be very expensive so I cant afford/justify buying high end makeup very often. I thought creating a list would be useful so I only buy things I really want. Also it may be useful if you have a birthday or another special occasion coming up and you don't know what to ask for. Also its fun for me just to look through different makeup products, even though I won't actually buy any of them.


Sunday 27 March 2016
AFFORDABLE BRUSHES REVIEW| LAMORA 10 PIECE BRUSH SET
For Christmas I received a £30 amazon gift card and originally I was going to buy loads of American drugstore makeup (milani, physicians formula etc.) but I was in need of new brushes because I barely had any and brushes are so expensive so I thought it was better to spend my money on brushes as I already have loads of makeup. On amazon there are so many unheard of brands with the exact same brushes so it was hard to choose which ones I wanted to buy. These particular brushes were down from £99.90 to just £24.95!!! To be honest when I ordered them I wasn't expecting them to be that great as they are so cheap considering your getting ten brushes. I believe this set of brushes is a dupe for the Sigma Kabuki Brush set which is triple the price and that's just for the face set. Lamora brushes have synthetic bristles and are made with a solid wood handle and a copper ferrule. Now I'll go in and describe all the brushes and tell you what I think of them .

Firstly I have the Flat Angled Kabuki brush. I like this one for applying concealer under my eye or applying cream contour. I will also use this if I want to apply loose powder underneath my eye to 'bake'.

Next I have the Flat Kabuki brush. I like this one to apply liquid foundations to my face.

Next I have the Angled Kabuki brush. I love this one to apply my blush but you could also apply bronzer or highlighter with this.

Next I have the Round Kabuki brush. I like this one to apply my bare minerals powder foundation.

Lastly for my face brushes I have the Tapered Kabuki Brush. I rarely use this because I find it removes any product underneath.

Now onto my eye brushes. Firstly I have the Precision Angled brush. I like this to pack eyeshadow onto my lid.

Next I have the Precision Round brush. I like this to apply eyeshadow to my outer corner. It is too dense to blend eyeshadow into the crease but it is good to pack the colour on.

Next I have the precision tapered brush. I like this to apply my inner corner highlight and brow bone highlight.

Lastly I have the Precision Flat and Precision Flat angled brush. I rarely use these two but they would be good to apply a small amount of colour onto the lid.


Thankyou for reading, hope you found it interesting.

Wednesday 23 March 2016
TEAL EYES MAKEUP TUTORIAL| BARE MINERALS MIX MASTER READY CONVERTIBLE EYESHADOW PALETTE
I saw this look on Anastasia Beverly Hills instagram account (here) and I thought it was so pretty, I wanted to try and recreate it but I didn't have any teal greens in my collection. But I recently got the Bare Minerals Mix Master ready 12 piece eyeshadow palette which has a matte teal eyeshadow in it so I attempted to recreate that look straight away!

Firstly, I did my eyebrows using the Freedom Brow Pomade and primed my eyes using concealer. The BareMinerals palette didn't have a warm orange shade so I used a bronzer in the crease to help me blend the shadow's I was going to apply next.

I then went on and packed on the shade Max volume onto the lid.

To blend the teal shade with the warm orange I used the shade Panorama, but you could use any matte black. I used a small blending brush to do this using windscreen wiper motions to blend the shade into the socket of my eye.

I added a mix of the shade Muse and Custom made to my inner corner and brow bone to lift my brow and open up my eye as I'm about to add eye liner to my waterline which will make my eyes appear smaller.

I now add kohl eyeliner to my waterline and draw a thin wing close to my lash line. I also bring the shade Panorama underneath my eye.

To finish the look I apply mascara to my top and bottom eyelashes, you could leave the look like this but I went on to add individual lashes.

And that's the finished look I hope you enjoyed this extra post. I will hopefully be posting more because I have two weeks off school where I will be writing loads of posts.

Sunday 20 March 2016
HOW TO GET GLOWING SKIN | MY FAVOURITE HIGHLIGHTERS
When I was younger and didn't wear much makeup, I would watch all these youtubers hype over different highlighters and I used to never like the look of them because I thought they just made you look oily. However, now I realise how much of a difference they do make, highlighters make you look more glowing and help to lift your face as sometimes I think having your makeup completely matte can make you look a bit flat. In this post I will be going through my favourite highlighters and go through why I like each of them. This ended up being quite a long post, but I hope you enjoy it nonetheless.
 Firstly, I have the Urban Decay Naked Illuminated Shimmering Powder in the Shade Luminous, Luminous has a white undertone, which is better for people with lighter skin tones whereas Aura has a gold undertone, which would be better for people with darker skin tones. When you wear this it is very obvious as it has a lot of glitter in it, so I find this is only nice on the cheeks, when I wear this on other areas of the face It can look too obvious unless that's the look you're aiming for. Also, It has a small brush in the bottom which is perfect for travelling. I am in love with the packaging, however it is quite bulky. It costs £22.50 which isn't too bad for a high end product. I also really like this in my inner corner and dusted over my eyelid.


Next I have my Freedom Pro Blush Palette in the shade Bronze Baked, this is such a good product. It is the cheapest of my highlighters and this is a whole palette which includes highlighters, blushers and bronzers. Bronze Baked has a wider range of colours whereas Peach baked mainly consists of Peachy blushers. There is only one matte product in this palette all the rest are shimmery and can be considered highlighters. My favourite shade for highlighting is the white toned highlighter in the top left corner of the palette. Below that are the two shades that I would consider blushers. These are both shimmery so these can be used by themselves instead of a blusher and highlighter for an all over glow or you can use a seperate highlighter. The rest of the shades are what I consider bronzers but these would be perfect highlighters for people with darker skin tones. The shade in the middle of the right side of the palette is a beautiful eyeshadow for all over the lid.


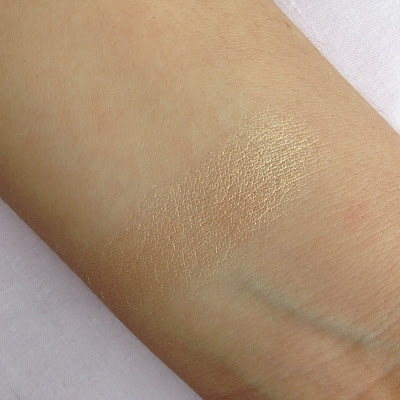
Next I have my current favourite highlighter, This is the Becca Shimmering skin perfector in Champagne Pop. Im sure pretty much everyone has heard of this, because it's such a beautiful highlighter and it was made with Jaclyn Hill. I love this highlighter mainly because it gives a sheen instead of just adding glitter, which makes it perfect for on the high points of your face. Before this collaboration I had never heard of the brand Becca, probably because it is quite expensive and it's not sold in anywhere other than Space.nk or online. There are 6 shades of the Shimmering skin perfector's excluding Champagne Pop, which are all equally as pretty but being £32 I couldn't purchase more than one. I loved this highlighter the moment it came out but I couldn't bring myself to spend £32 on a highlighter but I told myself if I did well in my exams I would treat myself. Champagne Pop has a gold undertone, I think it would be too dark for very light skin tones, I would advise Moonstone or Pearl. At first I wasn't a fan of the packaging but now I've got it I really like it, mainly because it looks and feels like it won't break.


Next I have my Stila eyeshadow in kitten. Just by reading the name of the product you can tell that it's not meant for the face but I think this is a gorgeous pink toned highlighter. These eye shadows are £12 and can be found in M&S or online, which I think is very affordable for a high end product. It is a perfect mix of glitter and a glow. As you can see in these pictures it has a lot of drop out so you can't always get it to go in a precise place as it often falls down onto somewhere you don't necessarily want it.


Next is the Soap & Glory Glow all out powder this is my most subtle highlighter,it doesn't have much glitter and is fairly matte. This is the perfect highlighter for people who are new to highlighting because it's difficult to go over the top and add to much. It has a pink undertone and is £11 from boots. I never hear anybody talk about this on youtube, I don't know why because I think it is a very beautiful product. Excuse the picture I dropped it a few months ago and it severely broke. I used to use this everyday before I got many different highlighters which I rotate between, However, it used to annoy me whenever I touched the powder with my brush so much product came off and I felt like I was wasting so much of it. I think it is so hard to find highlighters on the highstreet there is barely any, but I do really like this one


Next, I have my No7 Perfectley Bronzed dual Bronzer, again sorry for the picture I dropped it just before taking this picture which is so annoying! Anyway I think No7 products are so underrated, I have found so many amazing products from them but you never hear anyone talk about them. The highlighter has a very strong gold undertone, you can swirl together both shades for an all over bronzed glow or use the shades in different areas, which is what I like to do. I think this highlighter is especially good for darker skin tones because it is so dark. I wouldn't say No7 is high end but the products aren't the cheapest available. This product is sold for £12 in boots which is not too bad.


Lastly, I have the No7 instant radiance cream highlighter , this is currently the only cream highlight I have and I love it. I found this while looking for dupes for the Benefit Watts up highlighter that everybody on youtube hypes over. Since getting this I found it's a great dupe for the clinique cream highlight stick and the Rosie by Autograph cream highlight stick. This highlight has a white undertone with only small pieces of glitter in it which you can't really see on the face. I like to use this after applying my foundation, before I powder my face. I use this when I want my highlight to really pop because it makes all highlighters seem so much bolder. I like to put it on my fingertip then on to my face because if I drag it on my face straight from the stick it can remove the product underneath . This is £9.95 which I think is great as it looks pretty with everything. I have seen that Soap & Glory have recently released a cream highlight stick which is £8 so that might be worth looking at, Gabby (Velvetgh0st) says it's a great dupe for the Nars cocobana highlight. On the left is when it is blended and on the right It is right from the stick, so you can build it up to be that bold and not blend it out so much.


Sorry this post was so long, but I just get carried away when writing about makeup... Anyway thankyou for reading I hope it wasn't too boring.

Wednesday 16 March 2016
AFFORDABLE PLUM EYE TUTORIAL
I had some spare time on the weekend to write an extra blog post so I thought I would do a simple plum eyeshadow tutorial using affordable products. I brought some individual lashes a week ago and I really wanted to try them as I find normal fake eyelashes so difficult to apply. On my eyebrows I used the Freedom brow Pomade in dark brown and under my eyes I used the Rimmel wake me up concealer . As a base I used concealer and set it with translucent powder.


I then applied the shade 'Decent' from the Freedom palette. I wetted my brush to make the shadow more pigmented.


To finish the look I lined my eyes using my Rimmel Scandaleyes liquid eyeliner and added my eyelure individual lashes. I used around five long and medium lashes.

Sunday 13 March 2016
SKINCARE ROUTINE!
Today I'm going through my morning and evening skincare routines. I always watch skincare routines but a lot of skincare only works for specific skin types, also people want different things from their products. I would say I have dry to normal sensitive skin. I don't suffer with acne, just the occasional breakout. Generally I choose products to help with uneven skin tone.

My morning and evening skincare routine is very similar but I will state If I do anything different.
In the morning I begin with washing my face to remove any oil from the night before and to cleanse my face. To do this I use my Simple Kind To Skin vital vitamin Foaming Cleanser £4.49, I stopped using this for a few months and tried the Neutrogena Visibly Clear Grapefruit facial wash but while I used it I had break outs, I had not been using any different products so I know this was causing it, when I went back to the Simple Cleanser my skin improved.

After that I will use toner, I have only just started using toner but I think It has already made a difference. I am using the Simple soothing toner £3.29,

After I cleanse and tone I will moisturise. To do this I use my Cetaphil Moisturising Lotion £8.99, I have probably gone through about 2 or 3 of these, If ever I don't use this my skin goes very dry and tight. It is a very thin moisturiser so If you like a thicker moisturiser in the morning this may not suit you.

So that's all I will do in the morning before I begin to put my makeup on.
In the evening I repeat the same process but first I take my makeup off using two products. Firstly I use my Cetaphil gentle skin cleanser to remove my face makeup I do this twice and take it off using cotton pads. To remove my eye makeup I use the Clinique Take the day off balm which I have been using for years, I must have gone through up to six tubs! I find it doesn't irritate my eyes and it lasts for ages. Sometimes some of my makeup is still not completely off, so if it isn't I will go in with a cotton bud and the Simple eye makeup remover which usually removes any last trace of mascara.


Subscribe to:
Posts (Atom)